How to Send Follow Ups to Subscribers
In this tutorial we’ll tell how you can use G-Lock EasyMail to send consecutive but different emails to your subscribers within a period of time. Using this procedure you can easily setup an email training course and send each email from the course to each new subscriber to your list.
Let’s say you need to send a series of 5 emails with a gap of 3 days in between each one. You’ll also add new subscribers to the list and they need to get the first email in the sequence and run through until the end of the sequence.
To accomplish this task, you need to use G-Lock EasyMail Business edition as it supports the email campaign scheduler and external scripting languages.
To schedule consecutive emails, follow these steps.
Adding New Fields in the Address Book
Open G-Lock EasyMail address book.
Select the group of subscribers you will send consecutive emails to.
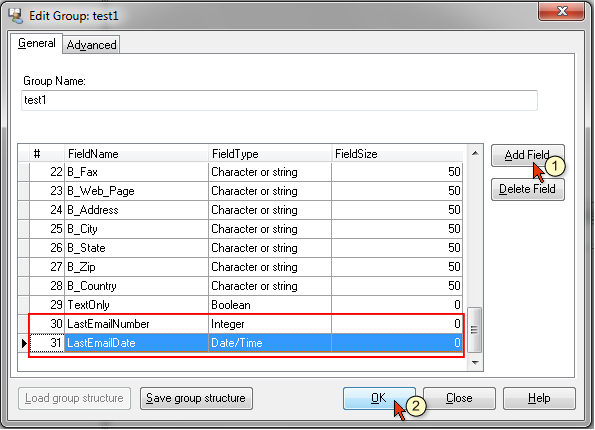
Double click the mouse on the group name. The “Edit Group” window will open.
Click Insert and add a new field where
Field Name – LastEmailNumber
Field Type – Integer
Click Insert and add another field where
Field Name – LastEmailDate
Field Type – Date/Time
Click OK to save the group structure.
After the fields are added close the address book.
Adding Scripts
Now you need to add two scripts that will check the number of the last sent email for each recipient and update the number of the last email in the address book after the sending is complete.
Click on the Tools menu in G-Lock EasyMail and then click on Script Repository.
Click on the Add button in the Script Repository.
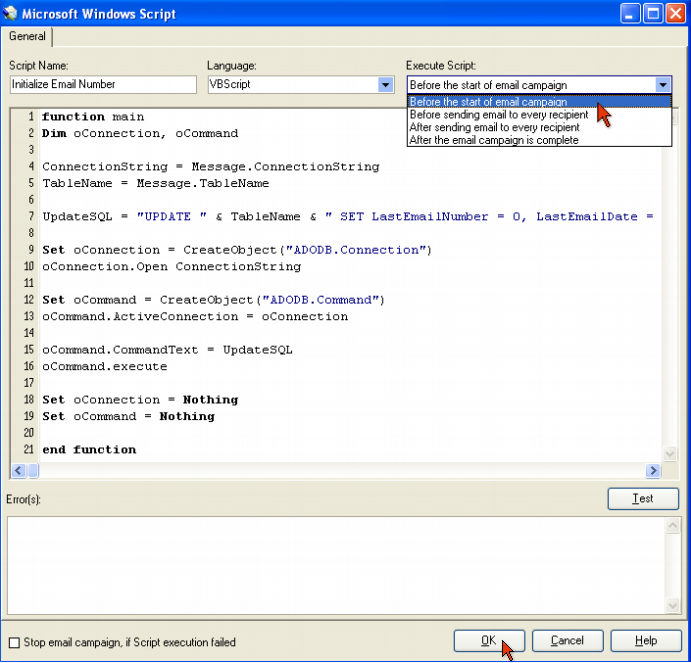
In the Microsoft Windows Script window:
Type the script name – Initialize Email Number
Select the scripting language – VBScript
Select the mode to execute the script – Before the start of email campaign
Copy the script below and paste it into the script window:
function main
 Dim oConnection, oCommand
ConnectionString = Message.ConnectionString
TableName = Message.TableName
UpdateSQL = "UPDATE " & TableName & " SET LastEmailNumber = 0, LastEmailDate = Date() WHERE ISNULL(LastEmailNumber)"
Set oConnection = CreateObject("ADODB.Connection")
oConnection.Open ConnectionString
Set oCommand = CreateObject("ADODB.Command")
oCommand.ActiveConnection = oConnection
oCommand.CommandText = UpdateSQL
oCommand.execute
Set oConnection = Nothing
Set oCommand = Nothing
end function
Click OK to save the script.
Click on the Add button in the Script Repository again to add the 2nd script.
Type the script name – Update Email Number
Select the scripting language – VBScript
Select the mode to execute the script – After sending email to every recipient
Copy the script below and paste it into the script window:
function main
 Dim oConnection, oCommand
 ConnectionString = Message.ConnectionString
 TableName = Message.TableName
 UpdateSQL = "UPDATE " & TableName & " SET LastEmailNumber = LastEmailNumber + 1, LastEmailDate = Date() " &_
 " WHERE Email ='" & Recipient.FieldByName("Email") & "'"
 Set oConnection = CreateObject("ADODB.Connection")
 oConnection.Open ConnectionString
 Set oCommand = CreateObject("ADODB.Command")
 oCommand.ActiveConnection = oConnection
 oCommand.CommandText = UpdateSQL
 oCommand.execute
 Set oConnection = Nothing
 Set oCommand = Nothing
 end function
When the scripts are added click Close to close the Script Repository.
Creating and Scheduling Emails
Now you can start creating and scheduling your email messages.
To schedule the 1st email in the sequence:
Open a new message in G-Lock EasyMail, type the content for the 1st message, select the account in the Form field, select the group in the Group field and click Send.
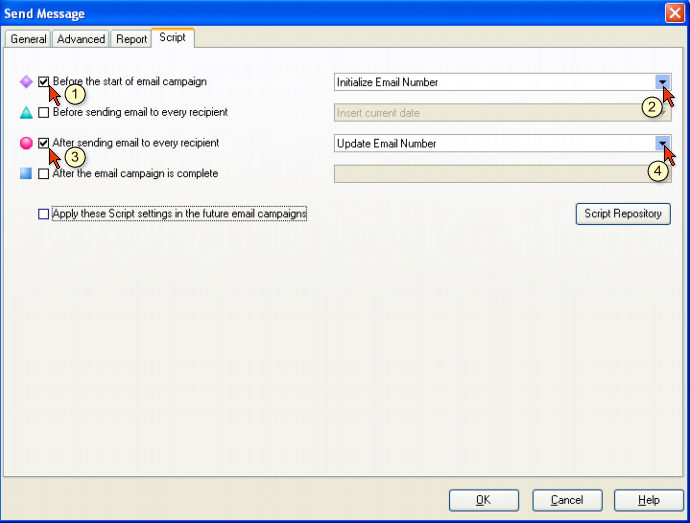
Click on the Script tab in the Send Message window.
Check the box next to “Before the start of email campaign” and select the “Initialize Email Number” script from the menu.
Check the box next to “After sending email to every recipient” and select the “Update Email Number” script from the menu.
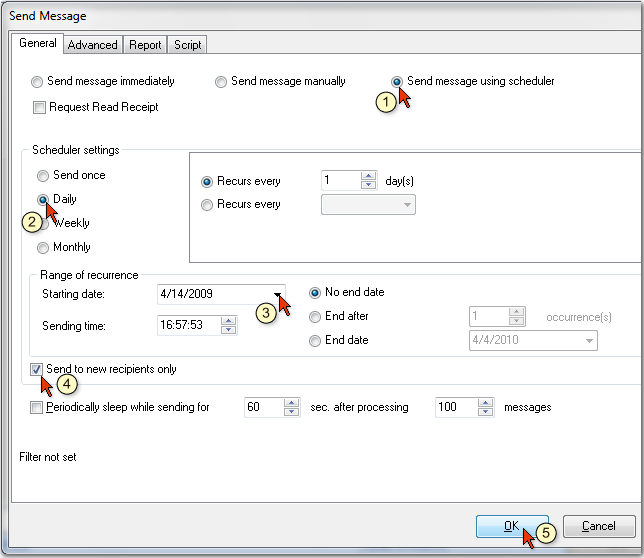
Go back to the General tab in the Send Message window.
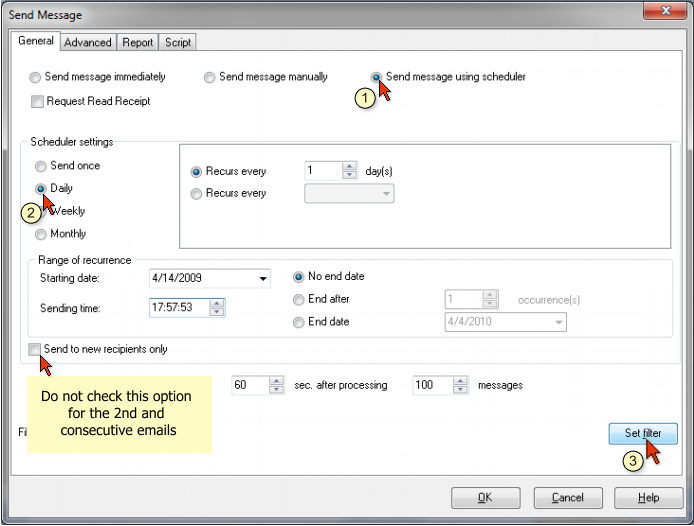
Check the “Send message using scheduler” option and set the scheduler in this way:
Daily
Recurs every 1 day
Starting date – select the date when the 1st email in the sequence must be sent.
Check “Send to new recipients” only option.
Click OK.
The 1st email will be moved to the Scheduler folder.
Now create and schedule the 2nd email in the sequence.
Open a new message in G-Lock EasyMail, type the content for the 2nd message, select the account in the Form field, select the group in the Group field and click Send.
Click on the Script tab in the Send Message window and select the same scripts as for the 1st message.
Check the box next to “Before the start of email campaign” and select the “Initialize Email Number” script from the menu.
Check the box next to “After sending email to every recipient” and select the “Update Email Number” script from the menu.
Now go back to the General tab in the Send Message window.
Check the “Send message using scheduler” option and set the scheduler in this way:
Daily
Recurs every 1 day
Now click on the Set Filter button.
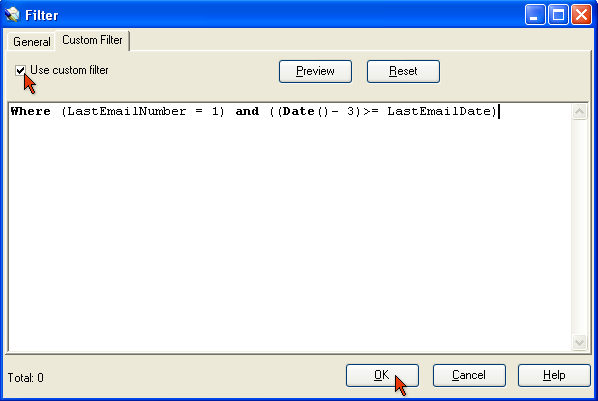
Click on the Custom Filter tab in the Filter screen.
Check the “Use custom filter” option and paste this filter criteria
Where(LastEmailNumber = 1) and ((Date()- 3)>= LastEmailDate)
where ((Date()- 3) means that the 2nd email will be sent 3 days later after the 1st one.
You can change the time period if you need. Just type another number instead of 3.
Click OK to save the filter and then click OK to save the 2nd scheduled message.
The settings for the 3rd and consecutive emails are the same as for the 2nd email. Only the filter criteria slightly differs for each message.
Thus, for the 3rd email the filter criteria is the following
Where (LastEmailNumber = 2) and ((Date()- 3)>= LastEmailDate)
For the 4th email in the sequence the filter will be as follows:
Where (LastEmailNumber = 3) and ((Date()- 3)>= LastEmailDate)
And for the 5th email:
Where (LastEmailNumber = 4) and ((Date()- 3)>= LastEmailDate)
I.e. the filter differs by the number of the last sent email.
So, after all 5 emails are scheduled, G-Lock EasyMail will automatically send them to your recipients with a delay of 3 days between ecah message. Each new subscriber will receive a whole course from the 1st email to the last message.
If you need you can tune the filter criteria and change the time period (number of days) between the emails in the course.