Configure WPNewsman Settings
General Settings
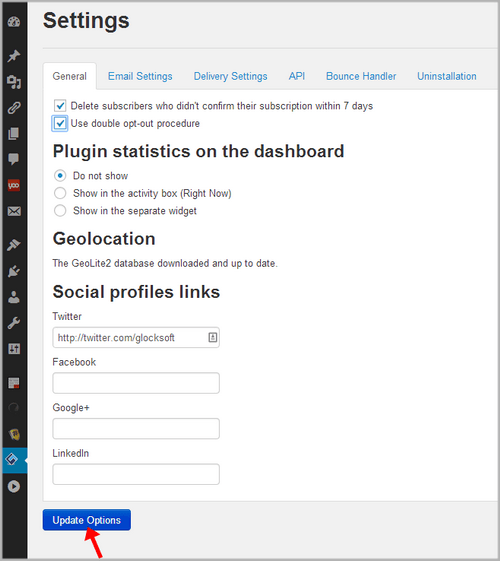
Delete subscribers who didn’t confirm their subscription within 7 days — if you check this option, the plugin will automatically delete the users who didn’t confirm their subscription within 7 days since the subscription date.
Use double opt-out procedure — check this option if you want your subscribers to confirm their decision to unsubscribe. The plugin will send them an email with a confirmation link. The user will not be unsubscribed until they click on the confirmation link.
Plugin statistics on the dashboard:
Do not show – check this box if you don’t want to display the plugin subscription report on your blog dashboard.
Show in the activity box (Right now) – check this box if you want to display the subscription report in the activity box on your blog dashboard.
Show in the separate widget – check this box if you want to display the subscription report in the separate widget on your blog dashboard.
Social Profiles Links
Twitter – enter the URL of your Twitter profile here if you want to use it in your email templates.
Facebook – enter the URL of your Facebook profile if you want to use it in your email templates.
Google+ – enter the URL of your Google+ profile if you want to use it in your email templates.
LinkedIn – enter the URL of your LinkedIn profile if you want to use it in your email templates.
Social profile URLs will be automatically linked to social sites images in your email templates.
To save the changes, click “Update Options”.

Email Settings
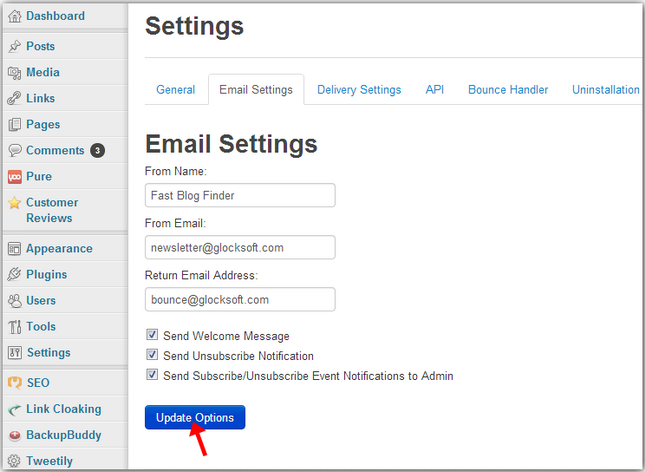
From Name — enter the name you want to send notification emails to new subscribers from. It may be either your contact name, or company name.
From Email — enter the email address you want to send notification emails to new subscribers from.
Return Email Address — enter the email address you want to receive bounced emails at.
Send Welcome Message — check this box if you want to send the welcome message to new subscribers.
Send Unsubscribe Notification — check this box if you want to send a notification that the user has successfully unsubscribed from your list.
Send Subscribe/Unsubscribe Event Notifications to Admin — check this box if you want to send a notification about the subscribe/unsubscribe event to the blog admin.
To save the changes, click “Update Options”.

Delivery Settings
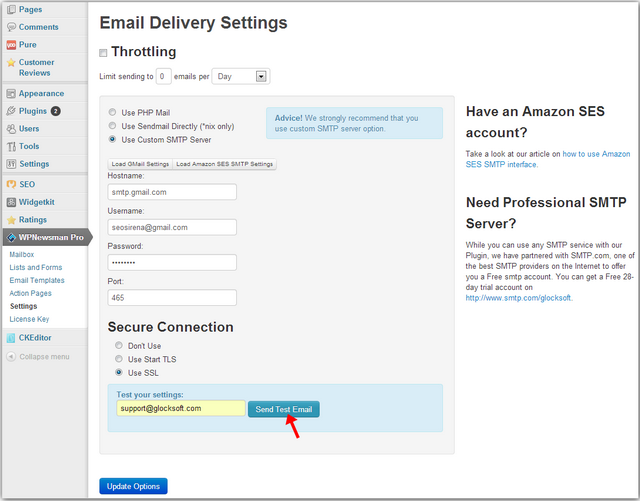
Throttling — if you want to limit email sending per day, hour or minute, check this option and enter the number of emails to send at a time and the time period.
Use PHP Mail — check this option to use your default mail settings (sendmail). If you get any errors using this option, you can select any of the sending modes below.
Use Sendmail Directly (*nix only) — you can use this sending option if your blog is on Linux or Unix platform.
Use Custom SMTP Server — you can use this option to send emails using your custom SMTP server. Fill in the following fields:
Hostname – name of your SMTP server
Username – your user name for the SMTP server
Password – your password for the SMTP server
Port – 25 by default
To use your Gmail account to send emails, click on “Load Gmail Settings”.
To use the Amazon SES SMTP settings to send emails, click on “Load Amazon SES SMTP Settings”.
Select Secure Connection option: Don’t Use, Use Start TLS, Use SSL.
To test if your SMTP settings are correct, enter your email address and click “Send Test Email”.
To save the changes, click “Update Options”.

Click on the image to enlarge it
API
Read here how to use WPNewsman API.
Bounce Handler
In the Pro version of WPNewsman you can use the built-in bounce handler module to process bounced emails after each mailing and keep your lists verified and up-to-date, thus protecting your IP address from being blacklisted for repeated sending to invalid users and maintaining a good sender reputation. Read here how to setup WPNewsman to handle bounced emails.
Uninstallation
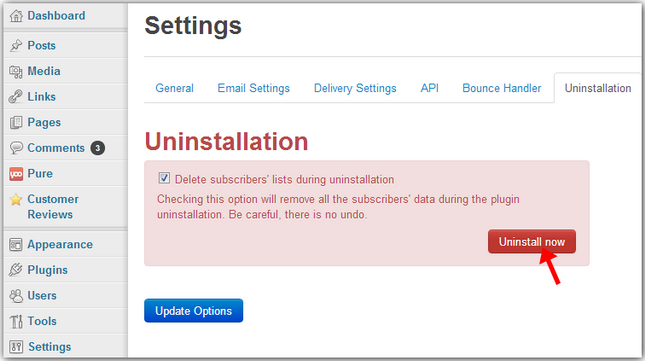
To uninstall the plugin, click on “Uninstall Now”.
Delete subscribers’ lists during uninstallation — if you check this option, your subscribers’ lists will be deleted during the plugin uninstallation.
